Using the Pete Supercomputer
Welcome to the OSU HPCC New User Tutorial
Connecting to the Pete Supercomputer
Why use a terminal?
Logging in to Pete with a terminal
- PuTTY (Windows)
Putty is a free and open-source terminal emulator that supports network protocols such as secure shell (ssh), which is what we use to log in to Pete.
To use PuTTY:
- You need to download the .exe file from: PuTTY-Download
- You can place the putty.exe file anywhere on your computer, the Desktop would be the easiest.
- Double click the putty.exe icon and a window will open like the image seen below.
- In the box labelled hostname, enter the name of the system you want to connect to: pete.hpc.okstate.edu
- Make sure the Connection type is SSH and the Port number is 22.
- In the Saved Sessions box, you can give a name for these login settings, i.e. Pete.
Click save.
- The next time you open Putty, you can double click this saved session and it will open a terminal window that will be ready to log you into Pete.
- After clicking 'Open', you'll be prompted first to enter your Pete username. Hit 'Enter' after you've typed your username.
- Next you'll be prompted to enter your password followed by 'Enter'.
- NOTE: The password will not show up on the screen as you type it.
- If you entered your password correctly, you should get the command prompt.
- If it says something like permission denied or login invalid, you might have entered your password incorrectly. Remember passwords are case sensitive.
- You need to download the .exe file from: PuTTY-Download
- Terminal (Windows, Mac, Linux)
For Mac and Linux users, there is a terminal application already installed on your computer.
- For Mac Users
- Double click on the hard drive icon >> the Applications folder >> the Utilities folder
- Double click on the Terminal icon - shown to the right
- For Linux Users
- If you are using Ubuntu press and hold the keys 'Ctrl' + 'Alt' + 'T'
- If you are using Centos press and hold the keys 'Alt' + 'F2'
With Windows 10 there is a terminal application called Windows Terminal that is free to download.
To log in to Pete through a terminal application follow these steps.
- In a terminal type: `ssh username@pete.hpc.okstate.edu`
- Where 'username' is your Pete username. (For Example: If your username was 'osuuser', you would enter: 'ssh osuuser@pete.hpc.okstate.edu')
- Next you'll be prompted to enter your password followed by 'Enter'.
- NOTE: Your password will not show up on the screen as you type.
- If you entered your password correctly, you should get the command prompt.
- If you have a message that says permission denied or login invalid, you might have entered your password incorrectly. Remember passwords are case sensitive.
- For Mac Users
Submitting a Job to Pete
- Copying Files
The first thing that will need to be done is creating a directory for the python and submission scripts. After
logging in to Pete:-
Type the command ‘pwd‘ and press Enter to see your current directory.
-
Use the command ‘mkdir sample‘ to create a new directory named ”sample” to house all of the
needed scripts.
-
Use the command ‘cd sample‘ to enter the new ”sample” directory .
-
Again use the command ‘pwd‘ to see your new working directory.
-
Type ‘cp /opt/example/applications/python/* <path to destination>‘ and press Enter to
copy the files to your new directory.
-
The ’*’ will copy all files in the directory ’/opt/example/applications/python/’ to your
destination.
-
Your ’<path to destination>’ should be the same as the result of using the ’pwd’ command
in step 4.
-
-
Use the command ‘ls -l‘ to make sure all files were copied over.
-
- Editing Files with Nano
A text editor such as ”nano” is a useful tool when working in the terminal environment. In this example we
will use ”nano” to alter the ”elephant.sbatch” to send an email when your calculation has finished. To do
this you need to:-
Open the text file that you want to change in nano with the command ’nano <name of the file>’
-
In this example ’<name of the file>’ is ’elephant.sbatch
-
-
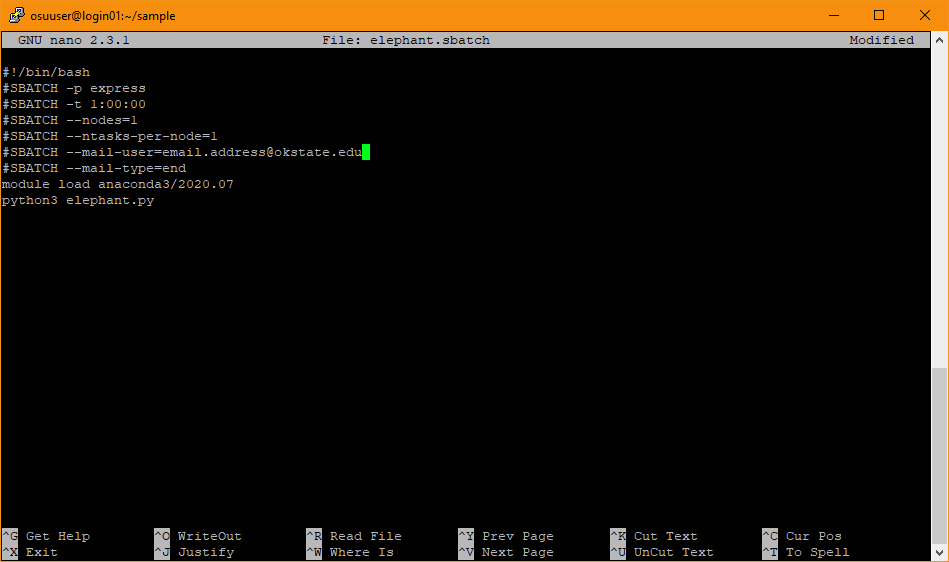
First you need to remove the extra # signs from the ”##SBATCH –mail-user=YOUR@EMAIL.ADDRESS” and ”##SBATCH –mail-type=end” lines. (see the image below)
-
You will also need to replace ”YOUR@EMAIL.ADDRESS” with the email address you would like Pete to send a message to once your job has finished.
-
Once changed you will the press ’ctrl’+’X’ to exit and save the changes.
-
Nano will first ask you if you want to save your changes at the bottom of the screen
-
To accept changes press ’Y’
-
Then press Enter to save them to the same file.
-
-
-
- Editing Files with VI
Another useful text editor and viewer is “VI”. This text editor is slightly more complex than “nano”, so the following example will show how to make the same alterations to the ‘elephant.sbatch’ submission file. To make these changes you need to:
-
Open the text file that you want to change in vi with the command ’vi <name of the file>'
-
In this example '<name of the file>' is 'elephant.sbatch'
-
-
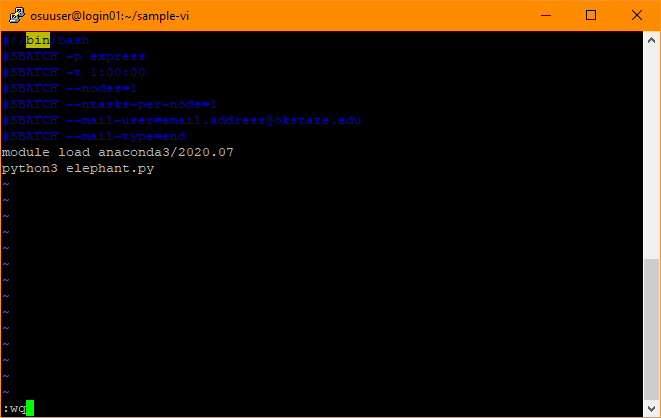
First you need to remove the extra # signs from the ”##SBATCH –mail-user=YOUR@EMAIL.ADDRESS” and ”##SBATCH –mail-type=end” lines.
-
To do this you will use the arrow keys to navigate to these # by pressing the ‘del’ button on both.
-
-
You will also need to replace ”YOUR@EMAIL.ADDRESS” with the email address you would like Pete to send a message to once your job has finished.
-
First delete the “YOUR@EMAIL.ADDRESS”
-
Then press the ‘i’ button to insert your email address
-
Once you’ve added your email address, click ‘esc’ to exit the text input
-
-
Once changed you will then press ‘shift’+‘:’, your text cursor will then be moved to the bottom of the window, type ‘wq’, and press ‘enter’
-
- Submitting Jobs
Once you have saved the changes to the submission script ’elephant.sbatch’ you can submit it to the queue
by using the command ‘sbatch elephant.sbatch‘Once submitted, Pete will tell you job number and which queue it was submitted to.
When the job has finished you will find two new files in your working directory:
-
The first is ’elephant.png’
-
The second is ’slurm-######.out’
The ’elephant.png’ contains the plot generated by the python script ’elephant.py’ which can be seen below.
This file can be downloaded to your personal computer using one of the file transfer methods described below.The ’slurm-######.out’ file (where ###### is the automatically assigned job number) contains
information from slurm about the job that you ran. If there were errors with your job they will be written
to this file -
- Cleaning Up
Since user storage space of your ’/home/<username>’ is limited, it is always a good idea to delete
files and directories that are no longer needed. You can remove individual files with the command ‘rm
<filename>‘, and entire directories with the command ‘rm -r <directory name>‘.
NOTE: Once deleted, there is no way to recover that file or directory, it is gone forever.
- Different Queues on Pete
There are eight different queues available on Pete:
- express (maximum walltime=1:00:00)
- For short jobs, and debugging codes
- Up to 32 cores and 96 GB of RAM per node
- batch (maximum walltime=120:00:00)
- For normal jobs, contains a mix of Intel Xeon Gold 6130 "Skylake" and Intel Xeon Gold 6226R "Cascade Lake" CPUs.
- Up to 32 cores and 96 GB of RAM per node
- skylake (maximum walltime=120:00:00)
- For jobs needing specific access to the Intel Xeon Gold 6130 “Skylake” CPUs
- Up to 32 cores and 96 GB of RAM per node
- cascadelake (maximum walltime=120:00:00)
- For jobs needing specific access to the Intel Xeon Gold 6226R "Cascade Lake” CPUs
- Up to 32 cores and 96 GB of RAM per node
- long (maximum walltime=504:00:00)
- For jobs requiring extended time
- Up to 32 cores and 96 GB of RAM per node
- bigmem (maximum walltime=168:00:00)
- For large memory jobs
- Up to 32 cores and 768 GB of RAM per node
- supermem (maximum walltime=168:00:00)
- For extra large memory jobs
- Up to 32 cores and 1.5 TB of RAM per node
- bullet (maximum walltime=120:00:00)
- For jobs done in tandem or solely on GPUs
- Up to 2 GPUs, 40 cores, and 192 GB of RAM per node
- express (maximum walltime=1:00:00)
Transfering Files to and from Pete
File Transfers with Graphical User Interfaces
- File Transfers with WinSCP
Download the WinSCP installer from WinSCP-Download.
- Once downloaded run the WinSCP-#.#.#.Setup.exe
- When finished the installer should place a "WinSCP.exe" icon on your desktop.
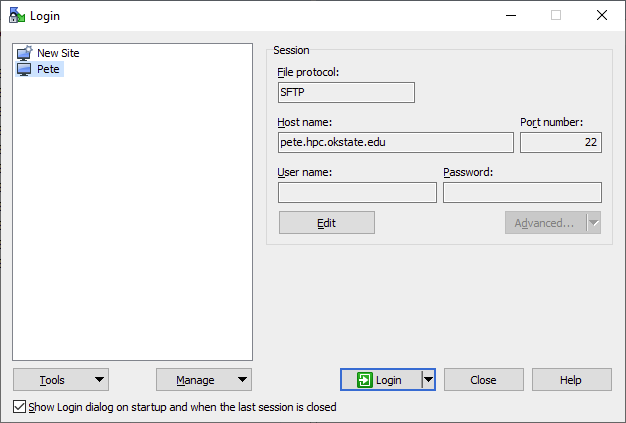
- To run WinSCP, double-click the "WinSCP.exe" icon, and a window like the one below will open.
- In the "Host name" box enter 'pete.hpc.okstate.edu', and for the "Port number" box enter '22'.
- In the "User name" and "Password" boxes you will enter your Pete user name and password.
- If you would like to save the above information for future use:
- Click the "Save" button underneath the "User name" box.
- Double-click on the session you just saved and click "Login" - this is all you have to do in the future to connect to Pete.
- If you choose not to save the session information, click "Login" to connect to Pete.
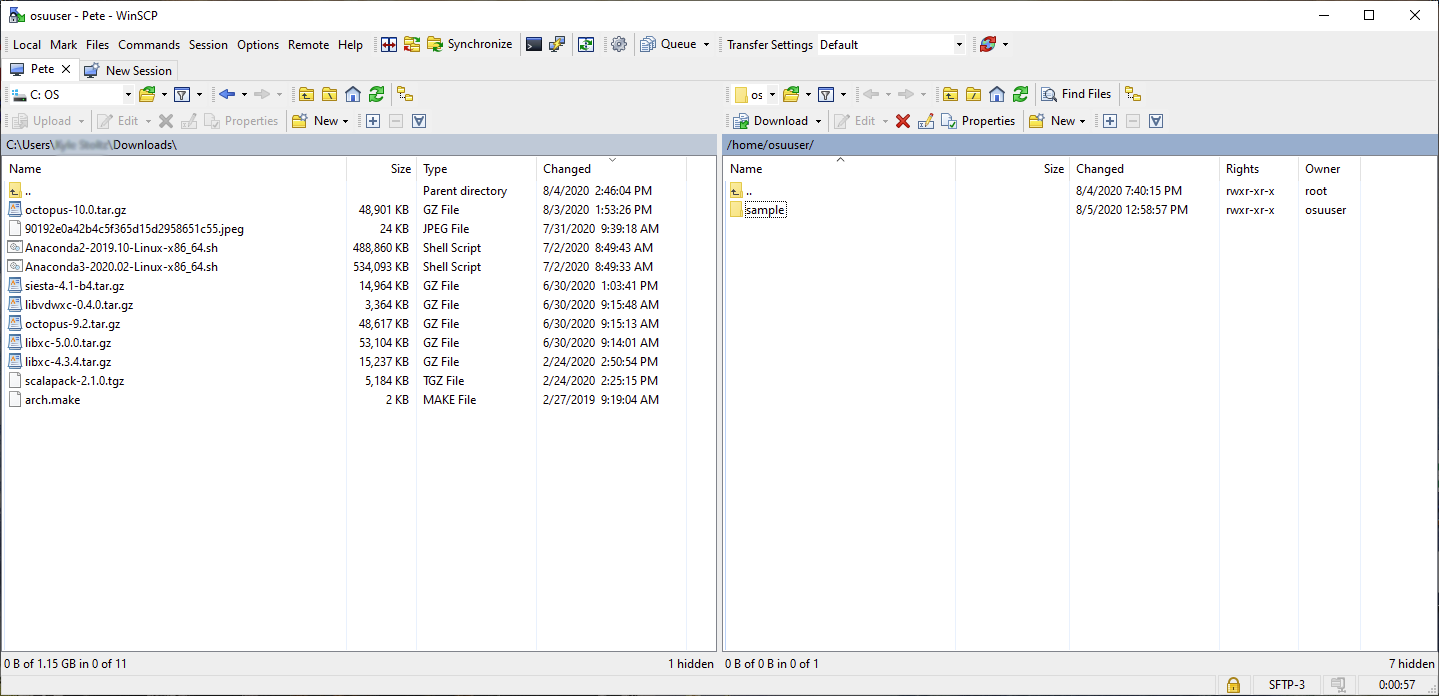
- Once you are connected, you should be greeted with a window similar to the one below.
- The left side of the screen is your local working directory (i.e. your current working
directory on your
computer), and the right side of the screen is the current working directory on Pete. - ‘drag and drop’ to copy files from Pete to your local computer, or from your computer
to Pete.
- You may be asked to confirm that you want to copy files.
- Once downloaded run the WinSCP-#.#.#.Setup.exe
- File Transfers with CyberDuck
First you’ll need to download CyberDuck from here: CyberDuck-Download
- Click the ”Download” icons below the duck.
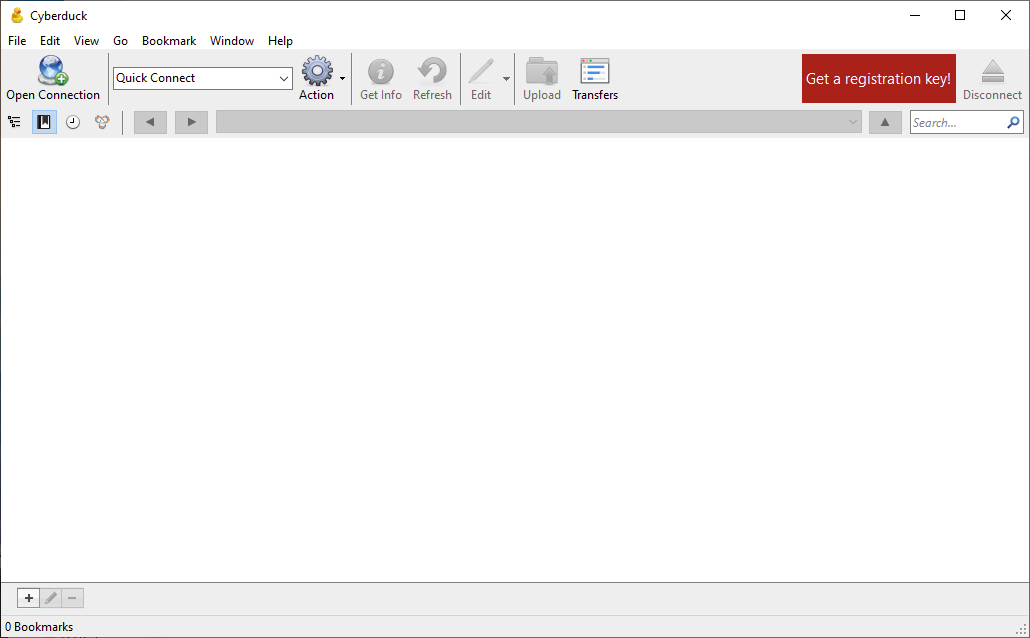
- After downloading and opening Cyberduck, you should have a window that looks like this:
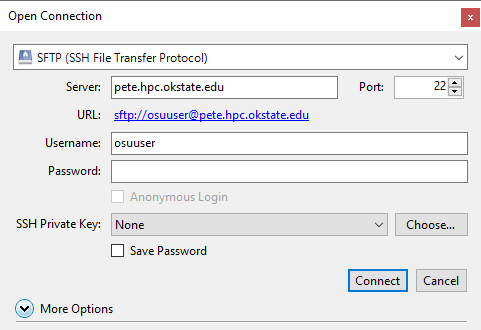
- Click on the ‘Open Connection’ icon at the top left. In the popup window, do the following:
- Choose the SFTP (SSH File Transfer Protocol)’ option in the drop down menu at the top
- For ‘Server’: ’pete.hpc.okstate.edu’
- Change ‘Port’ to '22'
- Enter your Pete username and password
- Click ‘Connect’
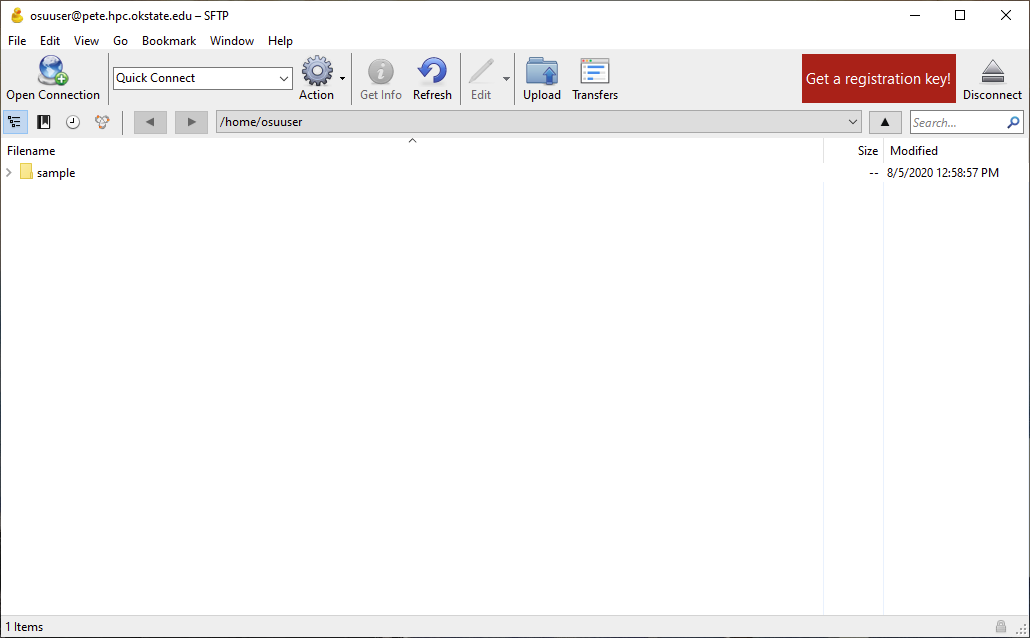
- After connecting, your CyberDuck window should now look like the window below – listing the contents of your home directory on Pete. You can ‘drag and drop’ files on Pete from this window onto your Desktop and vice versa.
- File Transfers with Globus
To use Globus first you'll need to setup an account at Globus.org.
To create your account follow these steps:
- Click ”Login” at the top of the screen.
- Select ”Oklahoma State University System” from the dropdown menu.
- This will take you to the familiar Oklahoma State University login screen.
- Login with your OKEY credentials.
- One the next screen you will need to select what you account is used for and read through the ”Terms of Service” and ”Privacy Policy”.
- Once you have completed your account creation,or login authentication, you can connect
to Pete by clicking on the empty ”Collection” bar.
- You will enter in the blank area ”okstate#pete”.
- You will then need to login in with your Pete username and password.
To connect Globus to your personal computer do the following:
- Click on the empty ”Collection” bar.
- Select ”More Options”.
- Then click ”Install Globus Connect Personal”.
- The Windows installer link will be visible
- For the Mac and Linux installer links click ”Show me other supported operating systems”
For more information visit Globus-Get-Started
File Transfers with Command Line Interfaces
- Moving files from Pete to your computer
- Open a terminal on your local machine, navigate to the directory you want the file
to go, and type the following on the command line:
- ’scp yourusername@pete.hpc.okstate.edu: directory-where-your-file-is-stored/yourfilename’.
- For example: ’scp osuuser@pete.hpc.okstate.edu:/scratch/osuuser/data/examplefile.txt’.
- You will be prompted to enter your Pete account password.
- Once your file is copied from Pete to your local machine, in the terminal, you’ll see the filename and 100%.
- You can now find the file in the folder you sent it to on your local machine.
- Open a terminal on your local machine, navigate to the directory you want the file
to go, and type the following on the command line:
- Moving files from your computer to Pete
- Open a terminal on your local machine and navigate to the directory where your file is located.
- Once there, type the following on the command line:
- ’scp localfilename yourusername@pete.hpc.okstate.edu:/directory/’
- For example: ’scp examplefile.txt osuuser@pete.hpc.okstate.edu:/scratch/osuuser/data/’
- You will be prompted to enter your Pete account password.
- When the file transfer completes you will see some connection information, and if the transfer was successful the progress should display 100%.
- Login to Pete and navigate to the directory that you uploaded the file to and type ‘ls‘ to ensure the transfer was successful.


